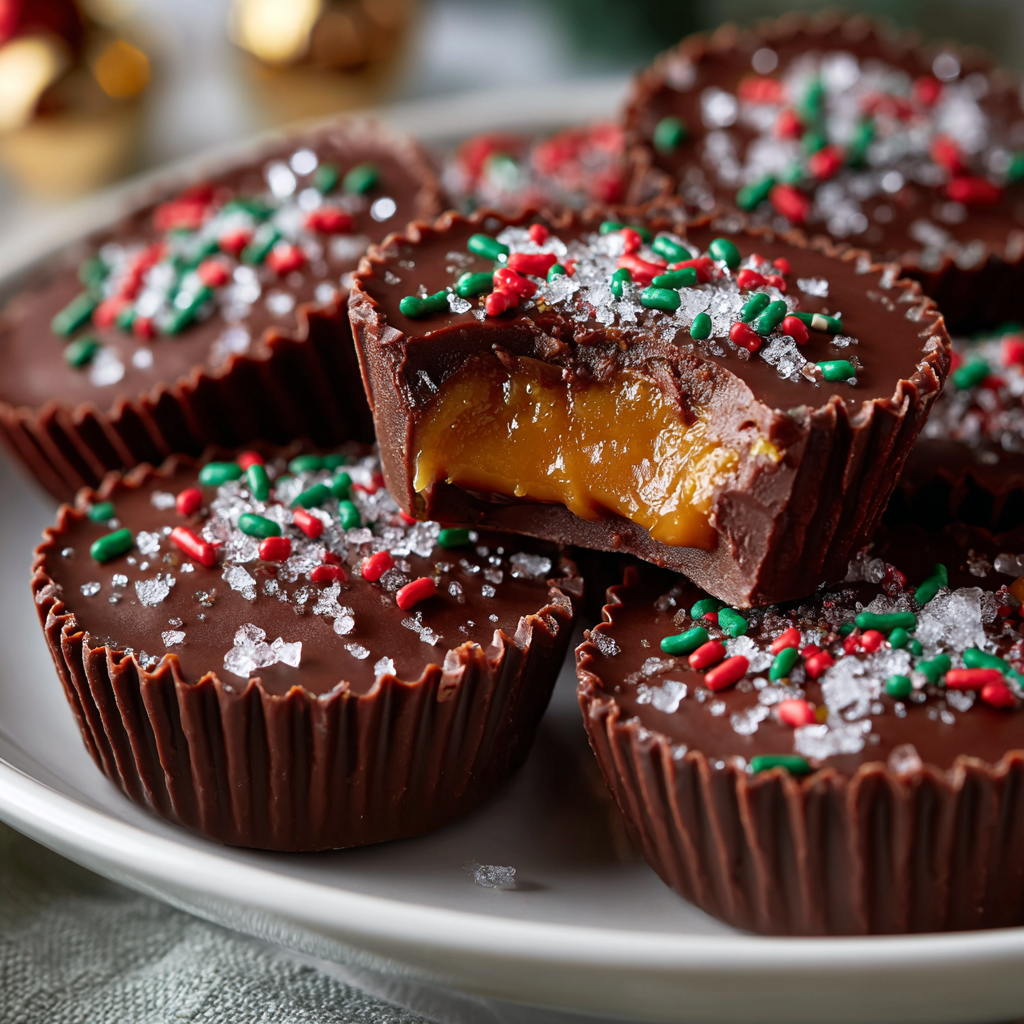
These Christmas Chocolate-Caramel Cups are little holiday treasures — smooth chocolate shells filled with rich, gooey caramel, and topped with festive sprinkles or sea salt. They’re perfect for gifting, dessert trays, or making for a cozy night in.
Why You’ll Love This Recipe
- Beautiful, elegant treat that feels like homemade bonbons.
- The contrast of silky chocolate and soft caramel is irresistible.
- A fun, no-bake (or very light heat) candy that’s beginner-friendly.
- Great for holiday gifting — make a big batch and portion into little cups.
- Customizable: use different chocolates, flavored extracts, or toppings.
Recipe Details
- Prep Time: ~20 minutes
- Cook Time (for caramel): ~10 minutes
- Set Time: ~1 hour (chill to harden)
- Total Time: ~1 hour 30 minutes
- Yield: ~24–36 mini cups (depending on size)
- Category: Dessert / Candy
- Method: Dip & Chill
- Diet: Vegetarian
- Keywords: chocolate caramel cups, holiday candy, Christmas treats
Ingredients You’ll Need
- 12 oz (≈ 340 g) chocolate (white, milk or dark) for the shells
- 1 cup granulated sugar
- ⅔ cup heavy cream
- ¼ cup butter
- ½ teaspoon vanilla extract (optional)
- Holiday sprinkles, sea salt, or chopped nuts for decoration
Instructions
- Line Your Molds
Place mini cupcake liners (paper or foil) into a mini muffin tin. - Make the Chocolate Shells
Melt about two-thirds of the chocolate in a microwave or over a double boiler.
Spoon a small amount into each liner, then use the back of a spoon or a small brush to spread up the sides to form a cup. Chill in the refrigerator until the chocolate sets. - Prepare the Caramel Filling
In a heavy saucepan over medium heat, melt the sugar without stirring too much, until it becomes a golden amber. Carefully whisk in the heavy cream, then the butter, and bring the mixture to a gentle simmer until smooth and slightly thickened. Remove from heat and stir in the vanilla if using. Let the caramel cool slightly until it thickens but still pourable. - Fill the Cups
Spoon a small amount of the cooled-but-still-pourable caramel into each chocolate shell, leaving a little space at the top for the lid. - Seal with Chocolate
Melt the remaining chocolate (if necessary), then spoon or pipe a layer on top of the caramel in each cup to seal it. Gently tap the tin to smooth the tops. - Decorate & Set
Immediately sprinkle the top of each cup with your chosen decorations: holiday sprinkles, a pinch of sea salt, or even tiny nut pieces. Chill in the refrigerator until the chocolate is fully set. - Serve
Once firm, remove the chocolate cups from the liners and serve. Keep them chilled until just before serving for best texture.
You Must Know
- Be cautious when working with hot caramel — it bubbles vigorously when cream is added.
- Make sure the initial chocolate shell is thick enough to hold the caramel without cracking.
- Chill the caramel slightly before filling if it’s too hot — this helps prevent it from melting through the chocolate.
- Decorate while the top chocolate layer is still wet so sprinkles or salt will stick.
- Store in a cool place so the cups maintain their shape.
Storage Tips
- Store the finished chocolate cups in an airtight container in the fridge for up to 2 weeks.
- For longer storage, you can freeze them: layer between parchment paper, freeze, and thaw in the fridge before serving.
- Let them sit a few minutes at room temperature before eating so the caramel softens slightly.
Ingredient Substitutions
- Use vegan butter and coconut cream to make a dairy-free caramel.
- Swap regular chocolate for white chocolate and tint with food coloring for a festive look.
- Replace some of the heavy cream in the caramel with flavored liqueur (like Irish cream or salted caramel) for an adult twist.
- Use crushed peppermint candies or pretzels for topping as an alternative to sprinkles.
Serving Suggestions
- Arrange these in a holiday candy box with other truffles and candies.
- Serve on a dessert board alongside cookies and chocolates for your Christmas gathering.
- Pair with a glass of dessert wine, hot cocoa, or espresso for a luxurious treat.
- Package a few in mini mason jars or decorative cellophane bags and tie with ribbon for a sweet gift.
Pro Tips
- Use a mousse or piping bag to help fill the cups neatly without making a mess.
- If your top chocolate layer is too thick, warm it gently in the microwave before spooning on top.
- For extra shine, once set, gently run a warm spoon over the top of each cup to polish.
- Use high-quality chocolate for both the shell and top layer to get rich flavour and smooth texture.
Frequently Asked Questions
→ Can I use store-bought caramel sauce instead of making my own?
Yes — just ensure it’s thick enough to stay inside the cup and not leak out.
→ Why did my chocolate shell crack?
Possible reasons: the caramel was too hot when filled, or the shell layer was too thin.
→ Can I make mini versions?
Definitely — use smaller liners or mini candy molds, and adjust your filling amounts accordingly.
→ Do these cups melt easily?
They can soften if left at room temperature for too long, so keep them cool, especially if it’s warm.
✨ These Christmas Chocolate-Caramel Cups are festive, rich, and handcrafted — a special treat that looks gorgeous, tastes decadent, and comes together without fuss.
Print
Christmas Chocolate-Caramel Cups
- Total Time: 30 minutes
- Yield: 24–36 mini cups 1x
Description
These Christmas Chocolate-Caramel Cups are little holiday treasures — smooth chocolate shells filled with rich, gooey caramel, and topped with festive sprinkles or sea salt. They’re perfect for gifting, dessert trays, or making for a cozy night in.
Ingredients
-
12 oz (≈ 340 g) chocolate (white, milk or dark) for the shells
-
1 cup granulated sugar
-
⅔ cup heavy cream
-
¼ cup butter
-
½ teaspoon vanilla extract (optional)
-
Holiday sprinkles, sea salt, or chopped nuts for decoration
Instructions
-
Line Your Molds
Place mini cupcake liners (paper or foil) into a mini muffin tin. -
Make the Chocolate Shells
Melt about two-thirds of the chocolate in a microwave or over a double boiler.
Spoon a small amount into each liner, then use the back of a spoon or a small brush to spread up the sides to form a cup. Chill in the refrigerator until the chocolate sets. -
Prepare the Caramel Filling
In a heavy saucepan over medium heat, melt the sugar without stirring too much, until it becomes a golden amber. Carefully whisk in the heavy cream, then the butter, and bring the mixture to a gentle simmer until smooth and slightly thickened. Remove from heat and stir in the vanilla if using. Let the caramel cool slightly until it thickens but still pourable. -
Fill the Cups
Spoon a small amount of the cooled-but-still-pourable caramel into each chocolate shell, leaving a little space at the top for the lid. -
Seal with Chocolate
Melt the remaining chocolate (if necessary), then spoon or pipe a layer on top of the caramel in each cup to seal it. Gently tap the tin to smooth the tops. -
Decorate & Set
Immediately sprinkle the top of each cup with your chosen decorations: holiday sprinkles, a pinch of sea salt, or even tiny nut pieces. Chill in the refrigerator until the chocolate is fully set. -
Serve
Once firm, remove the chocolate cups from the liners and serve. Keep them chilled until just before serving for best texture.
Notes
-
Be cautious when working with hot caramel — it bubbles vigorously when cream is added.
-
Make sure the initial chocolate shell is thick enough to hold the caramel without cracking.
-
Chill the caramel slightly before filling if it’s too hot — this helps prevent it from melting through the chocolate.
-
Decorate while the top chocolate layer is still wet so sprinkles or salt will stick.
-
Store in a cool place so the cups maintain their shape.
- Prep Time: 20 minutes
- Cook Time: 10 minutes
- Category: Desserts
- Cuisine: American
Nutrition
- Calories: 140kcal
- Sodium: 20mg
- Carbohydrates: 16g
- Protein: 1g