What the heck are these?
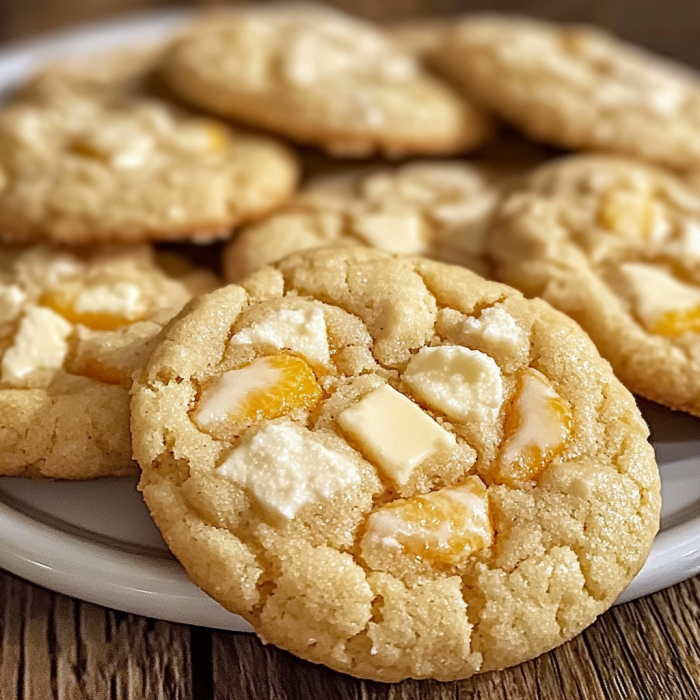
Remember those orange creamsicle popsicles that would drip all over your hands during summer? Yeah, I turned those into cookies. These babies are like summer nostalgia in cookie form – soft, pillowy cookies bursting with bright orange flavor and little pockets of creamy white chocolate that melt in your mouth. They’ve got this gorgeous orange hue (from real oranges, not that fake stuff) and the vanilla cream flavor that’ll transport you straight back to chasing the ice cream truck. My friend’s kid described them as “sunshine cookies,” and honestly, that’s pretty spot on.
Why You’ll Love This Recipe
Listen, I’m not saying these cookies will change your life, but my neighbor did offer to mow my lawn for a week in exchange for a dozen, so…
- They’re the perfect combo of citrusy and sweet without being too much of either
- The texture is INSANE – soft centers with slightly crisp edges
- They’re basically impossible to mess up (seriously, I’ve made these while half-watching true crime shows and they still turned out perfect)
- They’re unique enough to stand out at a bake sale or cookie exchange
- That orange-vanilla combo works all year round, not just summer
- They’ll make your kitchen smell like heaven for hours
- They stay soft for DAYS (if they last that long, which they won’t)
The Good Stuff You’ll Need
For the Cookies:
- 2½ cups all-purpose flour (don’t get fancy with specialty flours here)
- 1 tsp baking soda (check that it’s fresh – old baking soda = flat cookies)
- ½ tsp salt (I use kosher, but whatever’s in your pantry works)
- 1 cup unsalted butter, softened (leave it out for at least an hour, seriously)
- ¾ cup granulated sugar
- ½ cup light brown sugar, packed (dark brown works too, just gives a deeper flavor)
- 2 large eggs (room temperature makes a difference, trust me)
- 2 tsp vanilla extract (the real stuff, not that imitation nonsense)
- 2 tbsp fresh orange zest (from 2-3 oranges, depending on size)
- 3 tbsp fresh orange juice (just squeeze those oranges you zested)
- ¼ tsp orange extract (optional, but adds extra orange punch)
- 1-2 drops orange food coloring (optional – I usually skip it)
- 1½ cups white chocolate chips (or chunks if you’re feeling fancy)
For the Glaze (optional but worth it):
- 1 cup powdered sugar
- 2 tbsp fresh orange juice
- ½ tsp vanilla extract
- Pinch of salt
- Extra orange zest for sprinkling
Let’s Do This
Cookie Prep (15 minutes):
- Grab a medium bowl and whisk together your flour, baking soda, and salt. Set it aside and try not to snack on the dough too much later.
- In your stand mixer (or use a hand mixer if you’re building those arm muscles), beat the softened butter until it’s creamy – about 1 minute. If your butter isn’t properly softened, microwave it for 10 seconds. We’re not baking for the Queen here.
- Add both sugars to the butter and beat until it’s light and fluffy – about 2-3 minutes. Don’t skip this step! This is where the magic happens for soft cookies.
- Crack in those eggs one at a time, beating well after each. Scrape down the sides of the bowl with a spatula because otherwise you’ll have random streaks of egg in your cookies. Not cute.
- Pour in the vanilla extract, orange zest, orange juice, and orange extract if using. Beat until combined and your kitchen starts smelling amazing. Add food coloring now if you want that extra pop of orange.
- Switch your mixer to low speed (unless you enjoy wearing flour) and gradually add the dry ingredients. Mix just until combined – overmixing makes tough cookies, and nobody wants that.
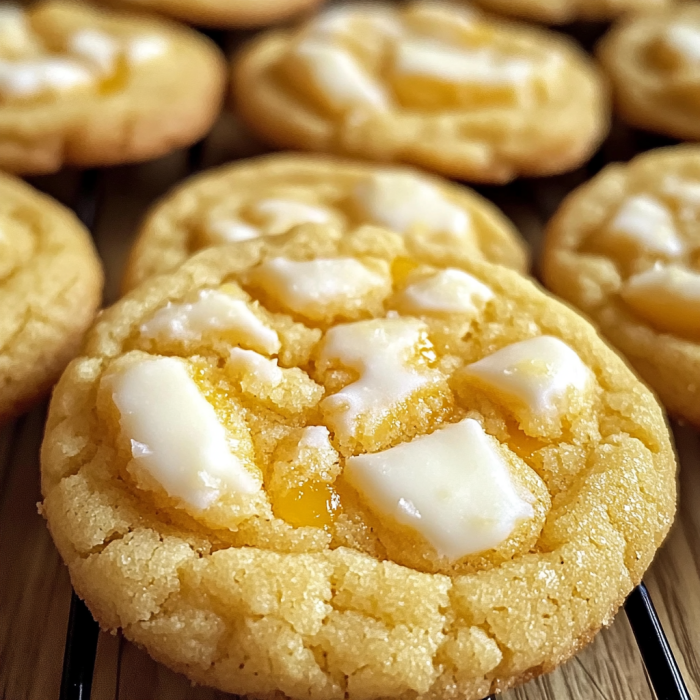
- Fold in those white chocolate chips with a spatula. I like to save a small handful to press into the tops before baking because it makes them look prettier.
- IMPORTANT: Chill the dough for at least 30 minutes, or up to 24 hours. I know it’s torture to wait, but chilled dough = thicker, better cookies. I usually stick it in the fridge and binge an episode of whatever I’m watching.
Baking Time (12 minutes per batch):
- Preheat your oven to 350°F (175°C). Line your baking sheets with parchment paper because scrubbing pans is for suckers.
- Scoop out dough using a cookie scoop or tablespoon – about 1½ tablespoons per cookie. Roll into balls if you want, or leave them as mounds for a more rustic look.
- Place dough balls about 2 inches apart on your baking sheets. Press a few extra white chocolate chips on top of each if you’re extra like me.
- Bake for 10-12 minutes, or until the edges are just starting to turn golden but the centers still look slightly underdone. They’ll continue cooking on the hot baking sheet, so don’t wait until they look completely done!
- Let them cool on the baking sheet for 5 minutes (they’ll fall apart if you move them too soon), then transfer to a wire rack to cool completely.
Making the Glaze:
- While the cookies are cooling, whisk together the powdered sugar, orange juice, vanilla extract, and salt in a small bowl until smooth.
- The glaze should be thick enough to set but thin enough to drizzle. If it’s too thick, add a tiny bit more orange juice. Too thin? Add more powdered sugar.
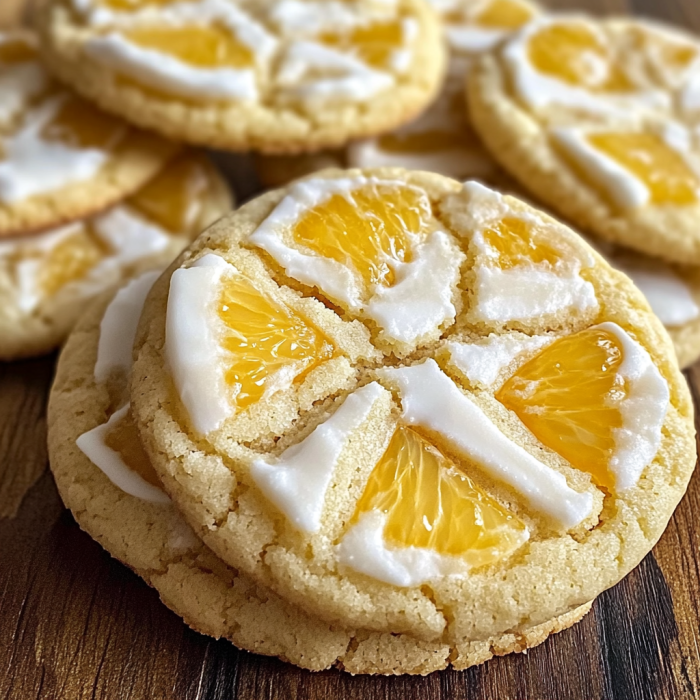
- Once the cookies are completely cool (I mean it – warm cookies + glaze = mess), drizzle the glaze over them using a spoon or fork. Sprinkle with a little extra orange zest while the glaze is still wet.
- Let the glaze set for about 30 minutes before stacking or storing. Or don’t wait and just eat them immediately. I’m not judging.
Serving Suggestions
- These are UNREAL with a scoop of vanilla ice cream sandwiched between two cookies. Summer dessert heaven!
- Serve with a cold glass of milk, hot cup of tea, or even a mimosa if you’re feeling fancy at brunch.
- Stack them on a white plate with some fresh orange slices and mint for a gorgeous dessert table centerpiece.
- They’re perfect for summer parties, baby showers (especially if it’s a “little cutie” theme), or any spring gathering.
- Keep a stash in the freezer and microwave for 15 seconds when you need an emergency cookie. We’ve all been there.
Switch It Up
Got the basics down? Try these twists:
- Double Chocolate Creamsicle: Add ¼ cup cocoa powder to the dry ingredients and use half white, half dark chocolate chips. Like a chocolate-dipped creamsicle!
- Coconut Creamsicle: Mix ½ cup toasted coconut into the dough and sprinkle some on top of the glaze. Tropical vibes!
- Cranberry Orange: Swap the white chocolate chips for dried cranberries for a tangier cookie. Perfect for fall and winter holidays.
- Lemon Twist: Replace the orange zest/juice with lemon for a different citrus kick. Add poppy seeds if you’re feeling adventurous.
- Creamsicle Thumbprints: Roll the dough into balls, make an indentation, and fill with orange marmalade or vanilla cream frosting after baking.
- Orange Shortbread Version: Cut the sugar to ½ cup total, add an extra ¼ cup flour, and slice and bake for a crisp cookie version.
Storage Solutions (If They Last That Long)
- Keep these babies in an airtight container at room temperature with a piece of bread to maintain moisture. They’ll stay soft and delicious for up to 5 days.
- If you want to freeze the baked cookies, layer them between parchment paper in a container and freeze for up to 3 months. Thaw at room temperature for about an hour.
- The dough freezes beautifully too! Roll into balls, freeze on a baking sheet until solid, then transfer to a freezer bag. Bake straight from frozen, just add 1-2 extra minutes to the baking time.
- Warning: the orange smell fades a bit after day 2, so if you want that full sensory experience, either eat them quickly (not a problem) or refresh with a tiny bit of orange zest sprinkled on top.
Questions People Actually Ask
Q: Can I use orange juice from a carton instead of fresh?
A: I mean, you CAN, but it won’t taste the same. Fresh oranges give you that essential zest and much brighter flavor. If you absolutely must use carton juice, add a bit more orange extract to compensate.
Q: My cookies spread too much and look flat! What went wrong?
A: Three possible culprits: 1) Your butter was too warm, 2) You didn’t chill the dough long enough, or 3) Your baking soda is old. Pop the remaining dough in the freezer for 15 minutes and see if the next batch improves.
Q: Can I make these gluten-free?
A: Yep! Use a 1:1 gluten-free flour blend (I like King Arthur or Bob’s Red Mill). The texture might be slightly different, but they’ll still be delicious.
Q: Do I really need the orange extract?
A: No, but it does amp up the orange flavor. Without it, they’re still good but more subtly orange. If you do use it, don’t go overboard – that stuff is potent and can taste artificial if you use too much.
Q: How do I know when they’re done if I can’t see them turning golden because of the orange color?
A: Look at the texture and edges. The edges should be set, but the centers should still look slightly underdone and puffy. They’ll deflate a bit as they cool, creating those perfect crinkly tops.
Q: My kids want to decorate these. Any suggestions?
A: Skip the glaze and make a thicker white icing they can spread on top. Set up bowls of sprinkles, colored sugar, and white chocolate chips for decoration. Or let them press orange candy slices on top right after baking!
Delightful Creamsicle Orange Cookies Recipe
Description
Remember those orange creamsicle popsicles that would drip all over your hands during summer? Yeah, I turned those into cookies. These babies are like summer nostalgia in cookie form – soft, pillowy cookies bursting with bright orange flavor and little pockets of creamy white chocolate that melt in your mouth. They’ve got this gorgeous orange hue (from real oranges, not that fake stuff) and the vanilla cream flavor that’ll transport you straight back to chasing the ice cream truck. My friend’s kid described them as “sunshine cookies,” and honestly, that’s pretty spot on.
Ingredients
For the Cookies:
- 2½ cups all-purpose flour (don’t get fancy with specialty flours here)
- 1 tsp baking soda (check that it’s fresh – old baking soda = flat cookies)
- ½ tsp salt (I use kosher, but whatever’s in your pantry works)
- 1 cup unsalted butter, softened (leave it out for at least an hour, seriously)
- ¾ cup granulated sugar
- ½ cup light brown sugar, packed (dark brown works too, just gives a deeper flavor)
- 2 large eggs (room temperature makes a difference, trust me)
- 2 tsp vanilla extract (the real stuff, not that imitation nonsense)
- 2 tbsp fresh orange zest (from 2–3 oranges, depending on size)
- 3 tbsp fresh orange juice (just squeeze those oranges you zested)
- ¼ tsp orange extract (optional, but adds extra orange punch)
- 1–2 drops orange food coloring (optional – I usually skip it)
- 1½ cups white chocolate chips (or chunks if you’re feeling fancy)
For the Glaze (optional but worth it):
- 1 cup powdered sugar
- 2 tbsp fresh orange juice
- ½ tsp vanilla extract
- Pinch of salt
- Extra orange zest for sprinkling