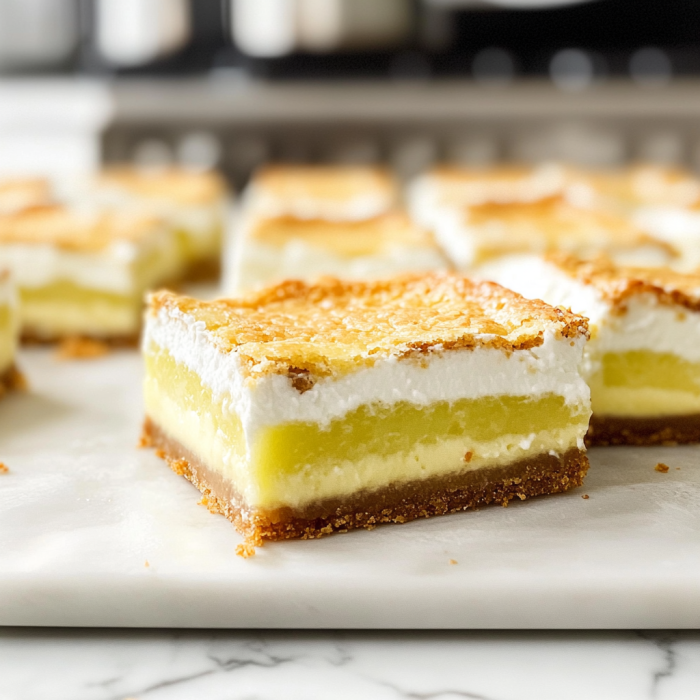
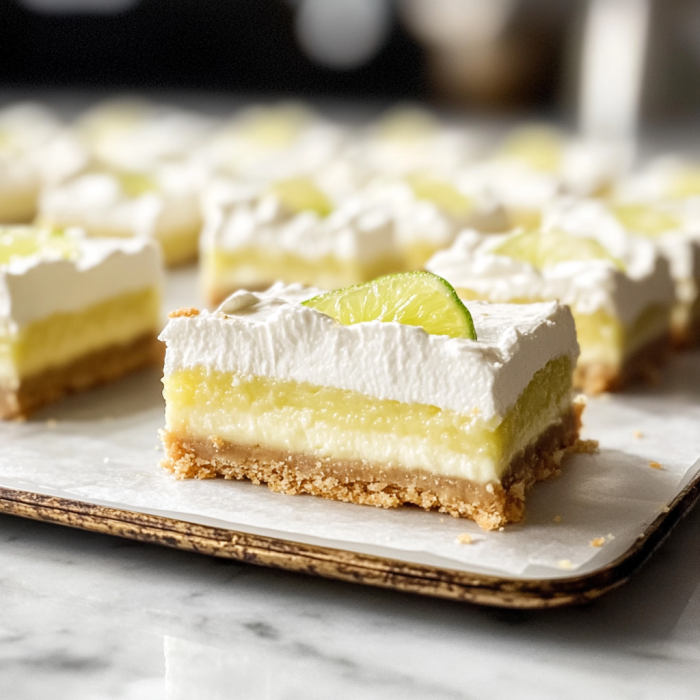
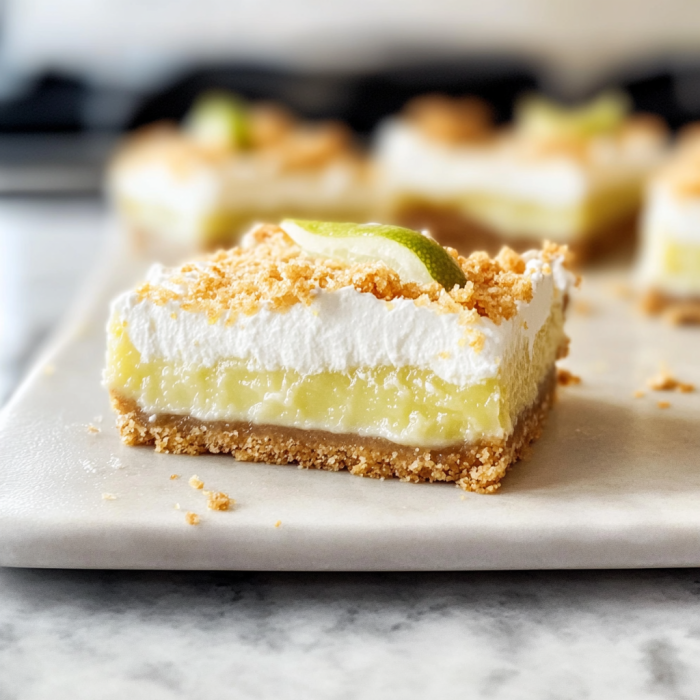
What Are Key Lime Pie Bars?
So I discovered these amazing key lime pie bars last summer and honestly haven’t stopped making them since! They’re basically everything you love about traditional key lime pie but in convenient, easy-to-grab bar form. The crunchy graham cracker crust with that creamy, tangy lime filling just hits different when you can pick it up with your fingers!
I first tried key lime pie on a trip to Florida years ago and became obsessed with that perfect sweet-tart flavor. These bars capture all that deliciousness without needing to book a flight to the Keys.
Why I’m Obsessed With This Recipe
Look, I’ve tried a LOT of dessert recipes over the years, but these key lime bars have earned a permanent spot in my rotation because:
- They’re ridiculously easy but taste like I slaved away for hours
- Everyone goes crazy for them – even my brother who “doesn’t like citrus desserts” asks for these
- You can make them a day ahead (they actually taste better!)
- They’re refreshing when it’s hot but also brighten up gloomy winter days
- The ingredients are simple stuff I usually have around anyway
- They travel well to potlucks and parties
The first time I made these, my husband ate four in one sitting. FOUR! That’s when I knew this recipe was a keeper.
What You’ll Need
For the crust (the buttery, crumbly base):
- About 10 full graham crackers, crushed up (or 1½ cups of crumbs)
- ⅓ cup sugar
- 1 stick of butter, melted
For the filling (the star of the show):
- 2 cans sweetened condensed milk (14 oz each)
- 1 cup of fresh lime juice (please don’t use the bottled stuff!)
- Zest from 2-3 limes
- 4 egg yolks
- Tiny pinch of salt
For topping (totally optional but makes them look fancy):
- Whipped cream
- Some extra lime slices
- Sprinkle of lime zest
Some real talk about ingredients:
Key limes are awesome if you can find them, but honestly, regular limes from the grocery store work great too. I’ve made these bars both ways and they’re always a hit.
Fresh juice is absolutely worth the extra few minutes of squeezing. That bottled stuff just doesn’t compare!
Don’t try to use low-fat condensed milk. I tried once and the bars didn’t set right. Just embrace the real deal!
Let’s Make These Bad Boys
Making the crust:
- Crank your oven to 350°F and line a 9×13 pan with parchment paper. Leave some paper hanging over the edges – this makes it super easy to lift the bars out later.
- Crush up your graham crackers. I use a food processor, but a ziplock bag and rolling pin works great too when I’m feeling some pent-up frustration!
- Mix the crumbs and sugar in a bowl, then pour in your melted butter. It’ll look like wet sand when it’s ready.
- Dump this mixture into your pan and press it down FIRMLY. I use the bottom of a measuring cup to really pack it in there.
- Bake for about 10 minutes until it smells amazing and looks slightly golden at the edges.
The filling part:
- Turn your oven down to 325°F.
- Grab a big bowl and whisk together the condensed milk, lime juice, zest, egg yolks, and salt. Your arm might get tired but keep going until it’s smooth! You’ll notice it getting thicker as you whisk – that’s the lime juice working its magic.
- Pour this mixture over your still-warm crust, making sure it spreads to all the corners.
- Pop it back in the oven for about 15-18 minutes. You want the edges set but the center should still have a slight jiggle – kind of like how cheesecake looks when it’s done.
- Let it cool on the counter for a bit, then refrigerate for AT LEAST 2 hours. Overnight is even better if you can wait that long!
The final touches:
- Once chilled, use those parchment paper flaps to lift the whole thing out onto a cutting board.
- Cut into squares with a sharp knife. I usually wipe the knife clean between cuts for those perfect edges.
- If you’re feeling fancy, add a dollop of whipped cream and a tiny slice of lime right before serving.
Pro tips from my kitchen disasters:
- DO NOT overbake these! They’ll continue to set in the fridge.
- Cold bars cut cleanly – patience pays off here.
- If the edges of your crust seem too hard, you probably packed it too firmly. Easy fix: just eat those pieces yourself and serve the prettier middle pieces to guests!
How to Serve These Beauties
These lime bars are pretty versatile:
For casual snacking, I just cut them up and put them on a plate. They disappear within minutes!
When friends come over, I like to add a dollop of homemade whipped cream and a tiny lime wedge to each bar. Sometimes I dust them with powdered sugar too.
For summer cookouts, I keep them in a cooler until dessert time. There’s nothing better than a cold lime bar after eating hot dogs and burgers!
During the holidays, I arrange them on a tiered cake stand with some raspberries scattered around. The red and green looks so festive!
What to drink with them? Coffee is perfect – the bitterness balances the sweetness of the bars. For boozy occasions, a glass of prosecco or even a margarita works surprisingly well!
Mix It Up: My Favorite Twists
After making these bars approximately one million times, I’ve played around with some variations:
Coconut lime version: Add 1/2 cup of toasted coconut to the crust mixture and sprinkle more on top. Instant tropical vacation vibes!
Ginger twist: Add 2 tablespoons of chopped crystallized ginger to the crust. The spicy-sweet combo with lime is AMAZING.
Berry good: Swirl some raspberry jam through the filling before baking. Just drop small spoonfuls over the top and use a toothpick to create pretty swirls.
Chocolate-dipped corners: After they’re chilled and cut, dip one corner of each bar in melted chocolate and let it set. The chocolate-lime combo is unexpectedly delicious.
Meringue-topped: Don’t waste those egg whites! Whip them with some sugar until fluffy, spread on top of the baked bars, and broil for a minute until golden. Like a key lime pie/lemon meringue pie mashup!
Keeping Them Fresh
In my house, these rarely last longer than 24 hours, but if you have more self-control:
Keep them in the fridge in an airtight container. If you’re stacking them, put parchment paper between layers so they don’t stick together. They’ll be good for about 5 days, though the crust gets softer as time goes on.
Want to make them way ahead? Freeze the whole uncut slab (without any toppings) wrapped tightly in plastic wrap and then foil. They’ll keep for about 3 months. Just thaw overnight in the fridge before cutting and serving.
These bars are perfect for make-ahead desserts! I often make them 1-2 days before having people over. The flavor actually gets better after a day in the fridge.
If you’re taking them somewhere, keep them cold in a cooler with ice packs. Nobody likes warm lime bars!
Questions You Might Have
“I can’t find key limes anywhere! Am I doomed?” Not at all! Regular limes work great. You’ll need about 4-5 medium limes to get enough juice. I’ve made them both ways and honestly, most people can’t tell the difference.
“My filling cracked! Did I ruin it?” Nope! That just means they baked a little too long. The good news is that they’ll still taste amazing, and a little whipped cream covers all manner of sins. Next time, pull them out when they still have that slight jiggle in the center.
“Can I use low-fat condensed milk to make these healthier?” I tried this once and they didn’t set properly. Some things just aren’t meant to be “healthified” – this is one of them. Enjoy in moderation!
“How far ahead can I make these for a party?” These are perfect make-ahead desserts! I usually make them 1-2 days before an event. The flavor actually improves after the first day as everything melds together.
“My filling isn’t setting up. Help!” Did you use the right amount of lime juice? The acid is what makes the filling set. Also, they need plenty of time in the fridge – at least 2 hours, preferably more. If all else fails and they’re still too soft, pop them in the freezer for an hour before serving and call them “frozen key lime bars” – problem solved!
“My bars look pale. Shouldn’t they be more green?” Real key lime filling is actually a pale yellow-green color, not the bright green you see in some bakeries. Those use food coloring. If you want yours greener, add a tiny drop of green food coloring to the filling.
“Can I make these in a smaller pan for thicker bars?” Absolutely! An 8×8 or 9×9 pan works great, but you’ll need to increase the baking time by about 5-7 minutes. Just watch for that slight jiggle in the center to know when they’re done.
Print
Easy Key Lime Pie Bars – A Refreshing Treat You’ll Love
Description
So I discovered these amazing key lime pie bars last summer and honestly haven’t stopped making them since! They’re basically everything you love about traditional key lime pie but in convenient, easy-to-grab bar form. The crunchy graham cracker crust with that creamy, tangy lime filling just hits different when you can pick it up with your fingers!
I first tried key lime pie on a trip to Florida years ago and became obsessed with that perfect sweet-tart flavor. These bars capture all that deliciousness without needing to book a flight to the Keys.
Ingredients
For the crust (the buttery, crumbly base):
- About 10 full graham crackers, crushed up (or 1½ cups of crumbs)
- ⅓ cup sugar
- 1 stick of butter, melted
For the filling (the star of the show):
- 2 cans sweetened condensed milk (14 oz each)
- 1 cup of fresh lime juice (please don’t use the bottled stuff!)
- Zest from 2–3 limes
- 4 egg yolks
- Tiny pinch of salt
For topping (totally optional but makes them look fancy):
- Whipped cream
- Some extra lime slices
- Sprinkle of lime zest