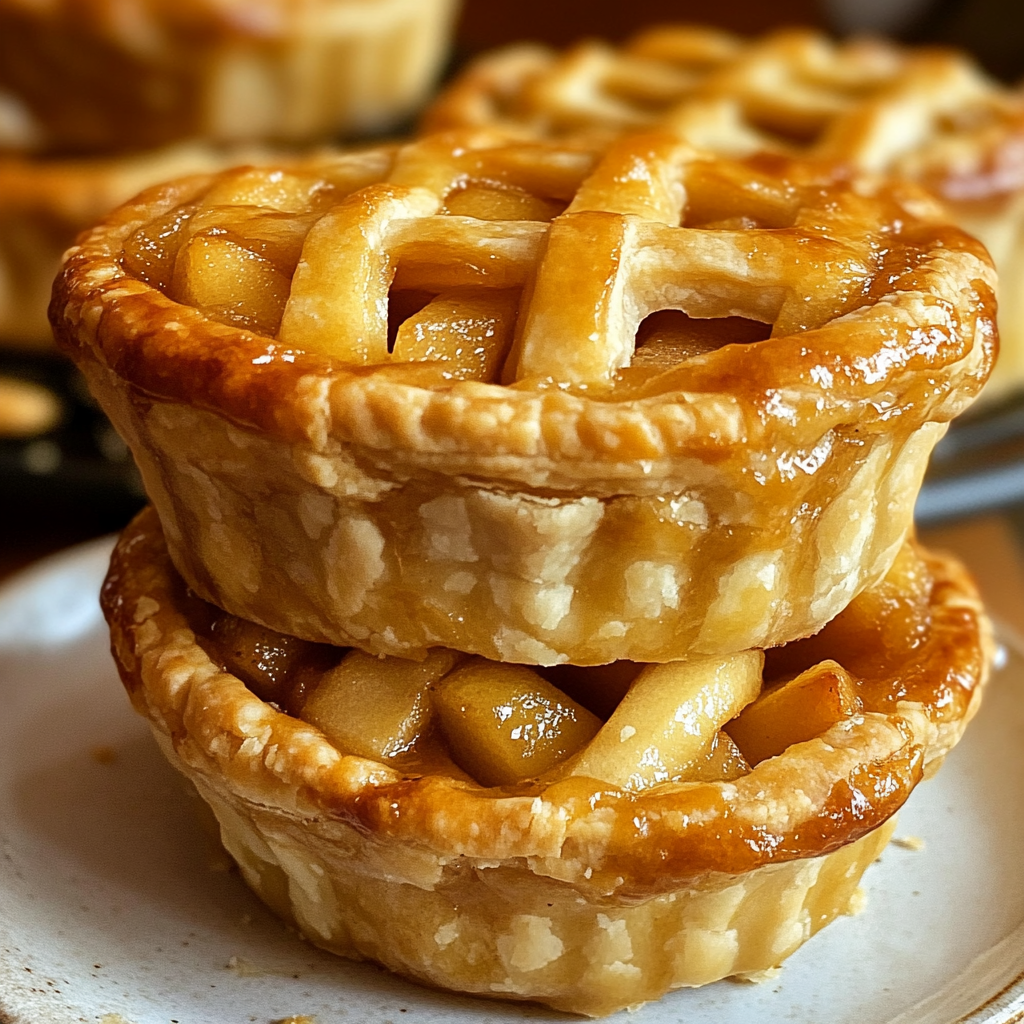
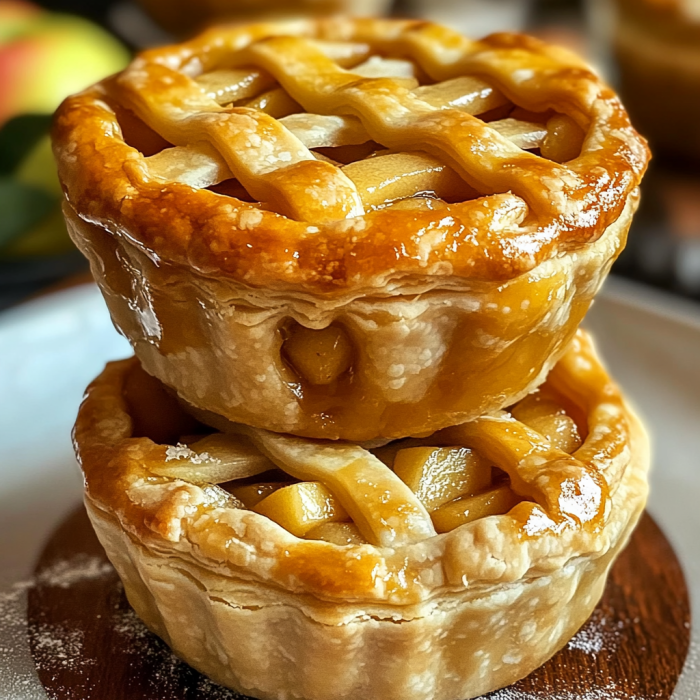
What the heck are these?
So these are basically the cutest little handheld apple pies you’ve ever seen. I got tired of making full-sized pies that nobody could finish (okay, I could finish them, but my jeans couldn’t), so I started making these adorable mini versions. They’ve got all the amazing flavor of a traditional apple pie – flaky crust, cinnamon-spiced apples, that incredible smell that takes over your kitchen – but in a perfect single-serving size. Plus, there’s a higher crust-to-filling ratio, which is a total win if you’re a crust person like me. Make these once and watch how fast they disappear at your next gathering!
Why You’ll Love This Recipe
- No sharing required! Everyone gets their own little pie (though people will definitely steal bites of yours).
- WAY faster to cool than a full pie. No more waiting for hours while staring longingly at a pie you can’t cut yet.
- Perfect for parties, bake sales, or just because it’s Tuesday and you deserve a mini pie.
- The cuteness factor is off the charts. People will think you slaved away all day.
- They freeze beautifully, so you can have emergency pie whenever the craving hits.
- You can customize each one differently (extra cinnamon, more sugar topping, different crust designs).
- No soggy bottom crusts! These little guys cook through perfectly every time.
The Good Stuff You’ll Need
For the Crust:
- 2½ cups all-purpose flour (the cheap stuff works fine, I promise)
- 1 tablespoon sugar (just regular granulated)
- 1 teaspoon salt (I use kosher, but whatever’s in your shaker works)
- 1 cup COLD butter (2 sticks, cut into small cubes and thrown in the freezer for 10 minutes)
- ¼ to ⅓ cup ice-cold water (emphasis on ICE cold)
- 1 tablespoon apple cider vinegar (trust me on this weird ingredient – it makes the crust flakier)
- 1 egg for egg wash (to make them all shiny and beautiful)
For the Filling:
- 4 medium apples (I like a mix – 2 Granny Smith for tartness and 2 Honeycrisp for sweetness)
- ½ cup brown sugar (light or dark, your call – I prefer dark for more molasses flavor)
- 2 tablespoons all-purpose flour (to thicken all those amazing apple juices)
- 1 tablespoon lemon juice (keeps the apples from turning brown and adds a little zing)
- 1 teaspoon cinnamon (the fancy Vietnamese kind if you’re feeling bougie)
- ¼ teaspoon nutmeg (freshly grated if you’ve got a nutmeg guy, or the pre-ground stuff)
- ¼ teaspoon salt (brings out all the flavors)
- 2 tablespoons butter (to dot on top of the filling because butter makes everything better)
For the Topping:
- 2 tablespoons coarse sugar (like turbinado or demerara – that crunchy stuff)
- Extra cinnamon for sprinkling (optional, but who doesn’t want extra cinnamon?)
- Vanilla ice cream for serving (not optional in my book!)
Let’s Do This
Make the Crust (15 minutes + 1 hour chilling):
- Throw your flour, sugar, and salt in a big bowl and mix them together.
- Add those ice-cold butter cubes and work them in with a pastry cutter, two forks, or just your fingers if you work fast. You want pea-sized chunks of butter still visible – don’t blend it completely! Those butter chunks = flaky crust.
- Mix the ice water and apple cider vinegar in a small cup. Drizzle a little at a time into your flour mixture, stirring with a fork until it just starts to come together. You might not need all the liquid! The dough should hold together when you squeeze it but not be sticky.
- Divide the dough in half, pat each half into a disk, wrap in plastic wrap, and chill in the fridge for at least an hour. (Real talk: I’ve definitely only chilled it for 30 minutes when I was in a hurry. It’s not ideal but it works.)
Prep the Filling (15 minutes):
- Peel, core, and dice your apples into small chunks – like, smaller than you think. These are mini pies, so you need mini apple pieces (about ¼-inch cubes).
- Toss the apples in a bowl with brown sugar, flour, lemon juice, cinnamon, nutmeg, and salt. Stir it all up and let it sit while you roll out the dough. The apples will start releasing their juices and getting all saucy and delicious.
Assemble and Bake (30 minutes prep + 25 minutes baking):
- Preheat your oven to 375°F. Grab a standard 12-cup muffin tin and give it a quick spray with cooking spray.
- Take out one disk of dough (keep the other one chilled). Roll it out on a floured surface until it’s about ⅛-inch thick. Use a round cutter or a wide-mouth glass (about 4 inches in diameter) to cut out 12 circles.
- Gently press each dough circle into a muffin cup, letting the edges stick up a bit. Don’t stress if they tear a little – just patch them up with extra dough. Pop the whole muffin tin in the fridge while you work on the tops.
- Roll out the second disk of dough. You can either:
- Cut out 12 more circles for traditional double-crust pies
- Cut strips for a lattice top (my favorite but a bit fiddly for minis)
- Use tiny cookie cutters to make cute shapes (stars, hearts, leaves)
- Or just grab a small round cookie cutter and do a simple polka dot pattern
- Take your muffin tin out of the fridge. Give your apple filling a good stir and spoon it into each dough-lined cup. Don’t be afraid to really pile it up – the apples will cook down. Put a tiny piece of butter on top of each pile of apples.
- Top each pie with your second crust however you decided to do it. If you’re doing a full top crust, make sure to cut a little vent hole with a knife.
- Beat that egg with a splash of water and brush it over the tops of your pies. Sprinkle with coarse sugar and a little extra cinnamon if you’re feeling it.
- Bake for 25-30 minutes, until the crust is golden brown and the filling is bubbling. If the edges start getting too dark too quickly, cover them with little strips of foil.
- Let them cool in the pan for about 10 minutes (I know it’s hard to wait, but your mouth will thank you for not burning it). Then gently lift them out and cool on a rack for as long as you can stand it.
Serving Suggestions
- OBVIOUSLY these need a scoop of vanilla ice cream. Like, that’s not even a question.
- For a fancy brunch situation, serve them with a dollop of slightly sweetened mascarpone cheese and a drizzle of maple syrup.
- Coffee. Strong, black coffee is the perfect partner for these little guys.
- If you’re going full fall vibes, serve them on a platter with some cinnamon sticks and little apple slices as garnish.
- For a party, set up a mini pie bar with different toppings: ice cream, whipped cream, caramel sauce, and maybe even some crushed candied pecans.
- These are perfect for packing in lunches or picnics since they’re self-contained!
Switch It Up
Bored with basic apple? Try these wild variations:
- Caramel Apple: Add 2 tablespoons of caramel sauce to the filling and drizzle more on top after baking.
- Apple Chai: Add a pinch of cardamom, ginger, and cloves to the filling for a chai spice vibe.
- Cranberry Apple: Throw in a handful of fresh or dried cranberries for a tart twist.
- Maple Bacon Apple: Add some crumbled cooked bacon to the filling and replace some of the sugar with maple syrup. It sounds weird but it’s INCREDIBLE.
- Boozy Apple: Add a tablespoon of bourbon or spiced rum to the filling. The alcohol will cook off but leave amazing flavor.
- Salty-Sweet: Sprinkle a tiny bit of flaky sea salt on top of the pies right after they come out of the oven.
Make-Ahead and Storage Tips
- The dough can be made up to 3 days ahead and kept in the fridge, or frozen for up to 3 months.
- You can assemble the whole unbaked pies and freeze them solid in the muffin tin, then pop them out and store in a freezer bag. Bake straight from frozen, just add about 10 minutes to the baking time.
- Baked pies will keep at room temperature for 2 days if covered (though they never last that long in my house).
- To reheat, pop them in a 300°F oven for about 10 minutes. The microwave works too (about 20 seconds) but the crust won’t be as crisp.
- If you freeze the baked pies, thaw them in the fridge overnight, then reheat in the oven for the best texture.

Questions People Actually Ask
Q: Can I use store-bought pie crust if I’m in a hurry/lazy/terrible at making crust?
A: Absolutely! No judgment here. You’ll need 2 rolls of the refrigerated kind. They won’t be quite as flaky, but they’ll still be delicious.
Q: My apples are releasing a lot of juice in the bowl. Should I drain some off?
A: Nope! That’s flavor gold right there. The flour in the filling will thicken it up as it bakes. Just make sure to spoon some of that juice into each pie.
Q: Can I make these in a mini pie pan instead of a muffin tin?
A: For sure! If you have one of those fancy mini pie pans, go for it. The baking time should be about the same.
Q: Which apples are best? I’m standing in the grocery store reading this.
A: I’m a big fan of mixing! Granny Smith + any sweeter apple (Honeycrisp, Gala, Pink Lady) gives you the perfect balance. Avoid Red Delicious – they turn to mush.
Q: How do I know when they’re done?
A: Look for golden brown crust and bubbly filling. If you can see the filling bubbling through the vents or lattice, that means the flour has gelatinized and the filling is thick enough.
Q: What’s the deal with the apple cider vinegar in the crust?
A: It inhibits gluten development, which makes for a more tender crust. You can’t taste it in the final product, I swear. If you don’t have it, lemon juice works too.

Mini Apple Pies That’ll Make Your Grandma Jealous
Description
So these are basically the cutest little handheld apple pies you’ve ever seen. I got tired of making full-sized pies that nobody could finish (okay, I could finish them, but my jeans couldn’t), so I started making these adorable mini versions. They’ve got all the amazing flavor of a traditional apple pie – flaky crust, cinnamon-spiced apples, that incredible smell that takes over your kitchen – but in a perfect single-serving size. Plus, there’s a higher crust-to-filling ratio, which is a total win if you’re a crust person like me. Make these once and watch how fast they disappear at your next gathering!
Ingredients
For the Crust:
- 2½ cups all-purpose flour (the cheap stuff works fine, I promise)
- 1 tablespoon sugar (just regular granulated)
- 1 teaspoon salt (I use kosher, but whatever’s in your shaker works)
- 1 cup COLD butter (2 sticks, cut into small cubes and thrown in the freezer for 10 minutes)
- ¼ to ⅓ cup ice-cold water (emphasis on ICE cold)
- 1 tablespoon apple cider vinegar (trust me on this weird ingredient – it makes the crust flakier)
- 1 egg for egg wash (to make them all shiny and beautiful)
For the Filling:
- 4 medium apples (I like a mix – 2 Granny Smith for tartness and 2 Honeycrisp for sweetness)
- ½ cup brown sugar (light or dark, your call – I prefer dark for more molasses flavor)
- 2 tablespoons all-purpose flour (to thicken all those amazing apple juices)
- 1 tablespoon lemon juice (keeps the apples from turning brown and adds a little zing)
- 1 teaspoon cinnamon (the fancy Vietnamese kind if you’re feeling bougie)
- ¼ teaspoon nutmeg (freshly grated if you’ve got a nutmeg guy, or the pre-ground stuff)
- ¼ teaspoon salt (brings out all the flavors)
- 2 tablespoons butter (to dot on top of the filling because butter makes everything better)
For the Topping:
- 2 tablespoons coarse sugar (like turbinado or demerara – that crunchy stuff)
- Extra cinnamon for sprinkling (optional, but who doesn’t want extra cinnamon?)
- Vanilla ice cream for serving (not optional in my book!)