Quick Overview
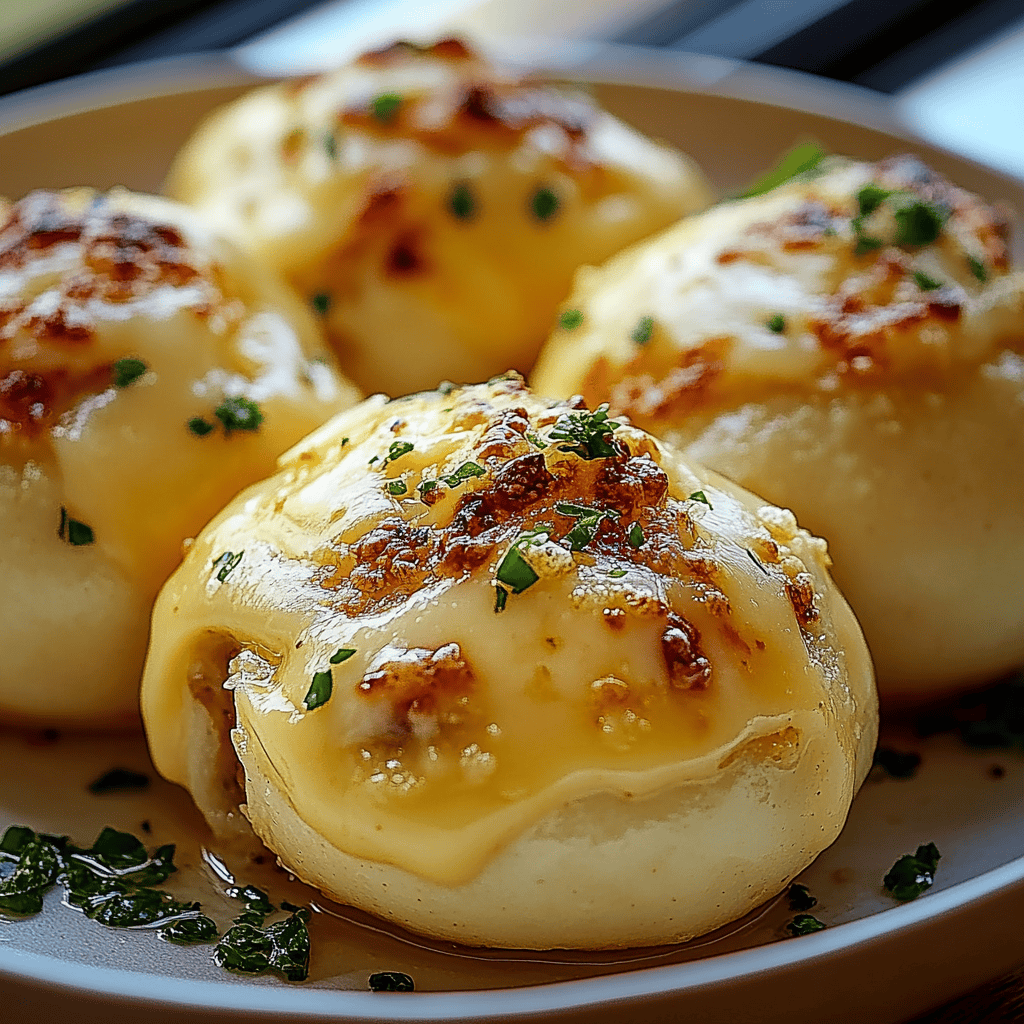
Are you ready to treat your taste buds? These CHEESY GARLIC BLISS BOMBS are the perfect combination of gooey cheese and rich garlic flavor wrapped in a delightful dough. Whether you need an appetizer for a gathering or a quick snack at home, these little bites of heaven will surely impress everyone. Easy to make and packed with flavor, this recipe is bound to become a favorite in your household!
Ingredient Breakdown
Dough
The foundation of our bliss bombs starts with the dough. For this recipe, you’ll need 2 cups of all-purpose flour. This will give your bombs the perfect texture.
Cheese
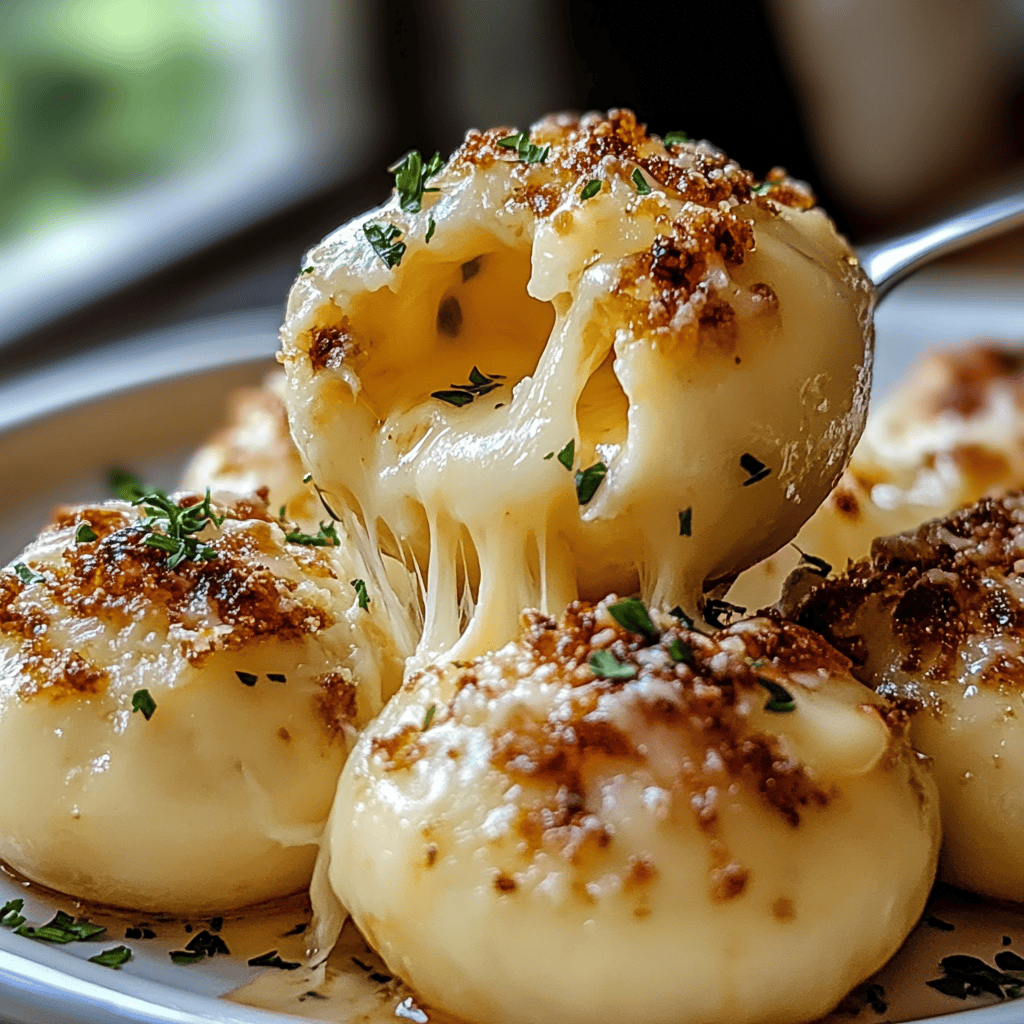
For this recipe, 1 cup of shredded mozzarella cheese is essential. Its melting properties create that gooey center everyone loves.
Garlic
You’ll need 4 cloves of fresh garlic minced finely. Garlic gives these bliss bombs their signature flavor profile, making them irresistible.
Butter
Using ½ cup of unsalted butter adds richness to the dough and enhances the overall taste. It helps create a golden crust that’s simply delicious.
Seasonings
A mixture of salt and pepper is crucial. Use 1 teaspoon of salt and half a teaspoon of pepper to season your bliss bombs perfectly.
Fresh Parsley
For garnish, ¼ cup of chopped fresh parsley adds a pop of color and freshness. It balances the rich flavors beautifully.
Step By Step Recipe: CHEESY GARLIC BLISS BOMBS
Step 1: Prepare the Dough
Start by preheating your oven to 375°F (190°C). In a mixing bowl, combine the flour and salt. Gradually add melted butter while mixing until you form a soft dough. Knead it gently on a floured surface for about five minutes until smooth. Cover the dough with a kitchen towel to keep it warm while you prepare the filling.
Step 2: Make the Filling
In another bowl, mix together shredded mozzarella cheese and minced garlic until well combined. This mixture should be creamy yet firm enough to hold its shape when formed into balls. You can adjust the amount of cheese based on your preference for cheesiness.
Step 3: Form the Bliss Bombs
Take small portions of dough about the size of a golf ball. Flatten each piece slightly in your palm before placing about one tablespoon of the cheese-garlic filling in the center. Carefully fold the edges over to enclose the filling completely, rolling it into a smooth ball shape.
Step 4: Bake
Arrange the formed bliss bombs on a baking sheet lined with parchment paper, ensuring they have enough space between them for even cooking. Bake them in your preheated oven for 20-25 minutes or until they turn golden brown and puffed up. Keep an eye on them to avoid burning.
Step 5: Garnish and Serve
Once baked, remove from the oven and let them cool for about five minutes on a wire rack. While they are still warm, brush each bomb lightly with melted butter and sprinkle chopped parsley over them for added flavor and presentation before serving.
Serving and Storing Tips
Tip 1: Serving Suggestions
Serve these CHEESY GARLIC BLISS BOMBS warm as an appetizer or snack at parties or family gatherings. They pair wonderfully with marinara sauce or ranch dressing for dipping. Guests will love reaching for these delicious bites!
Tip 2: Storing Leftovers
If you have any leftovers (which is rare), store them in an airtight container in the refrigerator for up to three days. Reheat them in an oven for best results before enjoying again; microwave reheating may cause them to lose their crispiness.
Tip 3: Freezing Options
To freeze these bliss bombs before baking, arrange them on a baking sheet lined with parchment paper in a single layer and freeze until solid. Once frozen, transfer them into freezer bags or containers for up to two months. Bake from frozen; just add an extra few minutes to cooking time when you’re ready to enjoy!
Mistakes to avoid
One common mistake when making cheesy garlic bliss bombs is not using fresh ingredients. Using stale or expired garlic can lead to a lackluster flavor. Fresh garlic enhances the dish’s aroma and taste, ensuring your bliss bombs are truly delicious. Always check your ingredients before starting the recipe for the best results.
Another mistake is overmixing the dough. This can result in dense and chewy bliss bombs instead of light and fluffy ones. Mix just until combined to maintain the right texture. If you feel unsure, mix by hand instead of using an electric mixer to control the consistency better.
Failing to preheat your oven is another error that many home cooks make. Baking in a cold oven can lead to uneven cooking and undercooked centers. Always preheat your oven to the specified temperature before placing your cheesy garlic bliss bombs inside for optimal baking.
Not allowing the bliss bombs to cool slightly before serving can also be a misstep. Serving them too hot may burn your mouth and mask their flavorful nuances. Let them rest for a few minutes after baking, allowing the cheese to set slightly and making them easier to enjoy.
Lastly, skimping on the herbs can dull the overall flavor profile of your cheesy garlic bliss bombs. Fresh parsley or chives can elevate the dish significantly, adding freshness and color. Don’t hesitate to sprinkle these herbs generously before serving for an unforgettable finish.
Tips and tricks
To make perfect cheesy garlic bliss bombs, start by selecting high-quality cheese. A blend of mozzarella and cheddar works wonderfully, providing both stretchiness and flavor. Grating the cheese yourself rather than using pre-shredded options ensures that it melts beautifully without added anti-caking agents affecting texture.
When preparing the dough, consider letting it rest for about 10 minutes after mixing. This allows gluten to relax, resulting in a softer texture once baked. During this time, you could prepare your garlic butter mixture, which should include melted butter mixed with minced garlic and herbs for extra flavor infusion.
For even cooking, space out each bliss bomb on your baking sheet. Overcrowding leads to steaming rather than baking, which affects crispiness. Aim for at least two inches between each ball so they brown nicely on all sides during baking.
If you want an extra layer of flavor, consider stuffing your cheesy garlic bliss bombs with a piece of seasoned cream cheese along with the grated cheese filling. This adds creaminess that contrasts beautifully with the crispy exterior while enhancing taste.
Finally, experiment with different seasonings in your garlic butter mixture. Adding smoked paprika or Italian seasoning can introduce new flavors that take these bliss bombs from ordinary to extraordinary.
Suggestions for CHEESY GARLIC BLISS BOMBS
Consider pairing cheesy garlic bliss bombs with a tangy dipping sauce like marinara or ranch dressing for added flavor diversity during serving. The combination of creamy cheese with zesty sauce provides an appetizing contrast that enhances each bite.
You might also want to serve these bites as part of a larger appetizer platter alongside other finger foods such as bruschetta or stuffed mushrooms. This approach allows guests to enjoy a variety of textures and flavors while keeping everyone entertained at gatherings or parties.
If you’re looking for variations, try incorporating different types of cheese based on personal preference or availability; goat cheese adds an interesting tang while blue cheese offers a bold flavor twist that can surprise your guests pleasantly.
For those who prefer a healthier option, consider baking instead of frying these cheesy delights; this method reduces excess oil while still achieving a golden-brown crust that everyone loves without compromising on taste.
Finally, don’t hesitate to add finely chopped vegetables such as spinach or sun-dried tomatoes into the filling mixture for an extra nutritional boost while maintaining great taste in every bite!
FAQs
What are CHEESY GARLIC BLISS BOMBS made of?
Cheesy garlic bliss bombs consist primarily of dough filled with gooey cheese and flavored with garlic and herbs. Common ingredients include flour, yeast, butter, grated mozzarella or cheddar cheese, minced garlic, and fresh parsley or chives. The combination creates delightful bites that are crispy on the outside yet soft and cheesy on the inside.
Can I make CHEESY GARLIC BLISS BOMBS ahead of time?
Yes! You can prepare cheesy garlic bliss bombs ahead of time by assembling them but not baking them yet. Place unbaked bombs on a baking sheet lined with parchment paper and freeze them until solid before transferring them into freezer bags. When ready to bake, cook directly from frozen; just add additional cooking time for perfect results.
How do I store leftovers?
After making cheesy garlic bliss bombs, you should store any leftovers in an airtight container at room temperature for up to two days or in the refrigerator for about five days if needed longer-term storage is required. Reheat them briefly in an oven or microwave before serving again so they regain their original warm texture!
Can I freeze CHEESY GARLIC BLISS BOMBS after baking?
Freezing baked cheesy garlic bliss bombs is possible! Allow them completely cool down first before placing them into airtight containers or resealable plastic bags suitable for freezing purposes. They remain well-preserved frozen for about three months; simply reheat when you’re ready!
What dishes pair well with CHEESY GARLIC BLISS BOMBS?
These delicious bites pair wonderfully alongside various dishes! Consider serving them as appetizers at gatherings alongside marinara sauce or ranch dressing dips; they also complement salads as sides during main course meals like pasta dishes or grilled chicken recipes beautifully!
Are there any substitutions I can make?
Absolutely! For those needing gluten-free options when creating cheesy garlic bliss bombs , use gluten-free flour blends instead! Vegans may substitute dairy products by implementing plant-based cheeses along with vegan butter alternatives while ensuring all other components align accordingly within dietary preferences too!
Summary
In summary, making delicious cheesy garlic bliss bombs involves avoiding common mistakes like using stale ingredients or overcrowding during baking. Follow essential tips such as choosing quality cheeses and letting dough rest properly along with helpful suggestions like pairing these treats with dips will elevate any meal occasion! With proper storage techniques included as well as flexible options available based on individual preferences—everyone can enjoy this tasty delight!
CHEESY GARLIC BLISS BOMBS
Description
Are you ready to treat your taste buds? These CHEESY GARLIC BLISS BOMBS are the perfect combination of gooey cheese and rich garlic flavor wrapped in a delightful dough. Whether you need an appetizer for a gathering or a quick snack at home, these little bites of heaven will surely impress everyone. Easy to make and packed with flavor, this recipe is bound to become a favorite in your household!
Ingredients
Dough
The foundation of our bliss bombs starts with the dough. For this recipe, you’ll need 2 cups of all-purpose flour. This will give your bombs the perfect texture.
Cheese
For this recipe, 1 cup of shredded mozzarella cheese is essential. Its melting properties create that gooey center everyone loves.
Garlic
You’ll need 4 cloves of fresh garlic minced finely. Garlic gives these bliss bombs their signature flavor profile, making them irresistible.
Butter
Using ½ cup of unsalted butter adds richness to the dough and enhances the overall taste. It helps create a golden crust that’s simply delicious.
Seasonings
A mixture of salt and pepper is crucial. Use 1 teaspoon of salt and half a teaspoon of pepper to season your bliss bombs perfectly.
Fresh Parsley
For garnish, ¼ cup of chopped fresh parsley adds a pop of color and freshness. It balances the rich flavors beautifully.